Looking to make a gallery wall that makes a statement? We've got tips that will leave your space looking polished. It's all about choosing varied, complementary pieces and planning out their spacing ahead of time.
When our family bought the Boise house, it was totally sparse. It has a smart layout that maximizes space, and lots of charming midcentury accents. Beautiful hardwood floors underfoot and a central fireplace in the living room invite guests to kick back and cozy up. It was only logical that we accent that area with thoughtful pieces.
I wanted to create a gallery wall that reflected the outdoorsy culture of Idaho, the history of this neighborhood, and the varied personalities in our own family – with some modern flair! That said, we knew we'd have to be careful to make a gallery wall that wasn't too cluttered for this small home. It clocks in at barely over a thousand square feet.
The longest blank wall in the whole house spans about twenty feet from the living room to the dining room / kitchen area. Several of those feet on the end are already taken up with a door to the garage, and the refrigerator. We did manage to fit a nice, long couch along that wall, and we knew we'd need to leave enough head room above it as well. Here's how we pulled this space off!
Select your Central Piece(s)
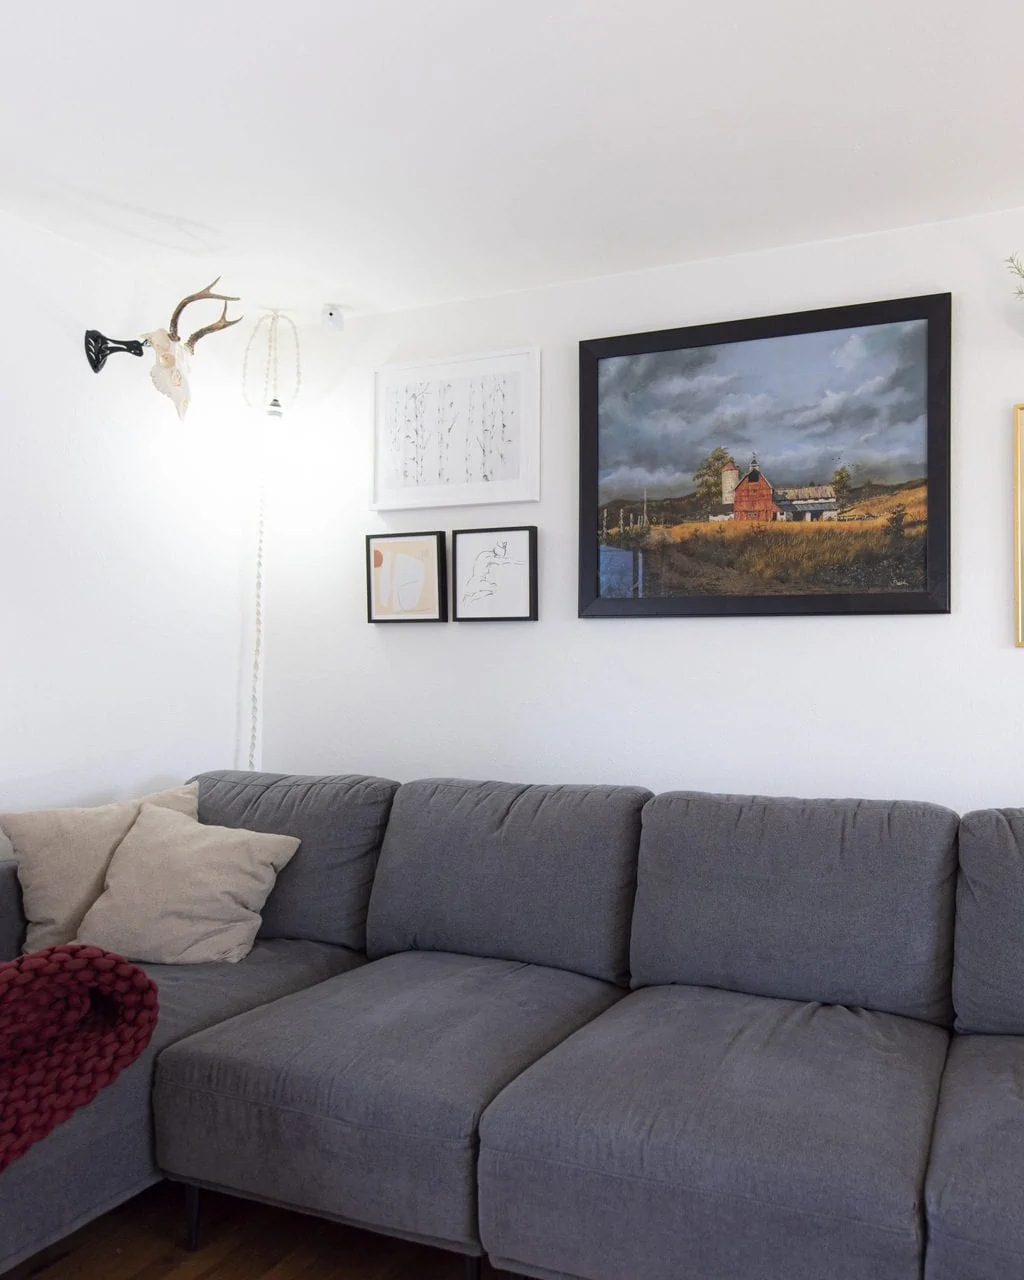
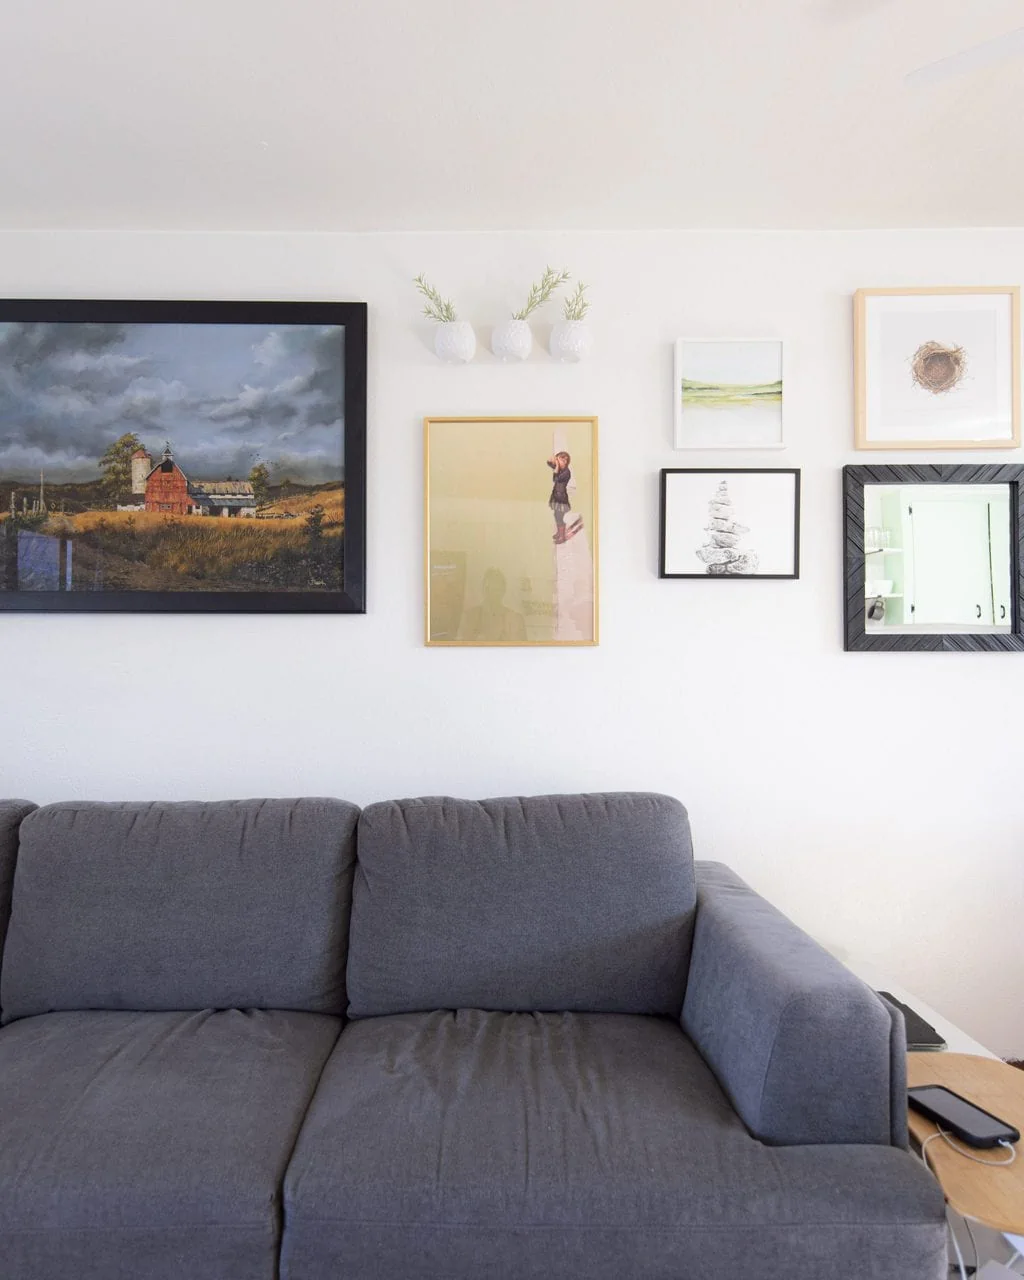
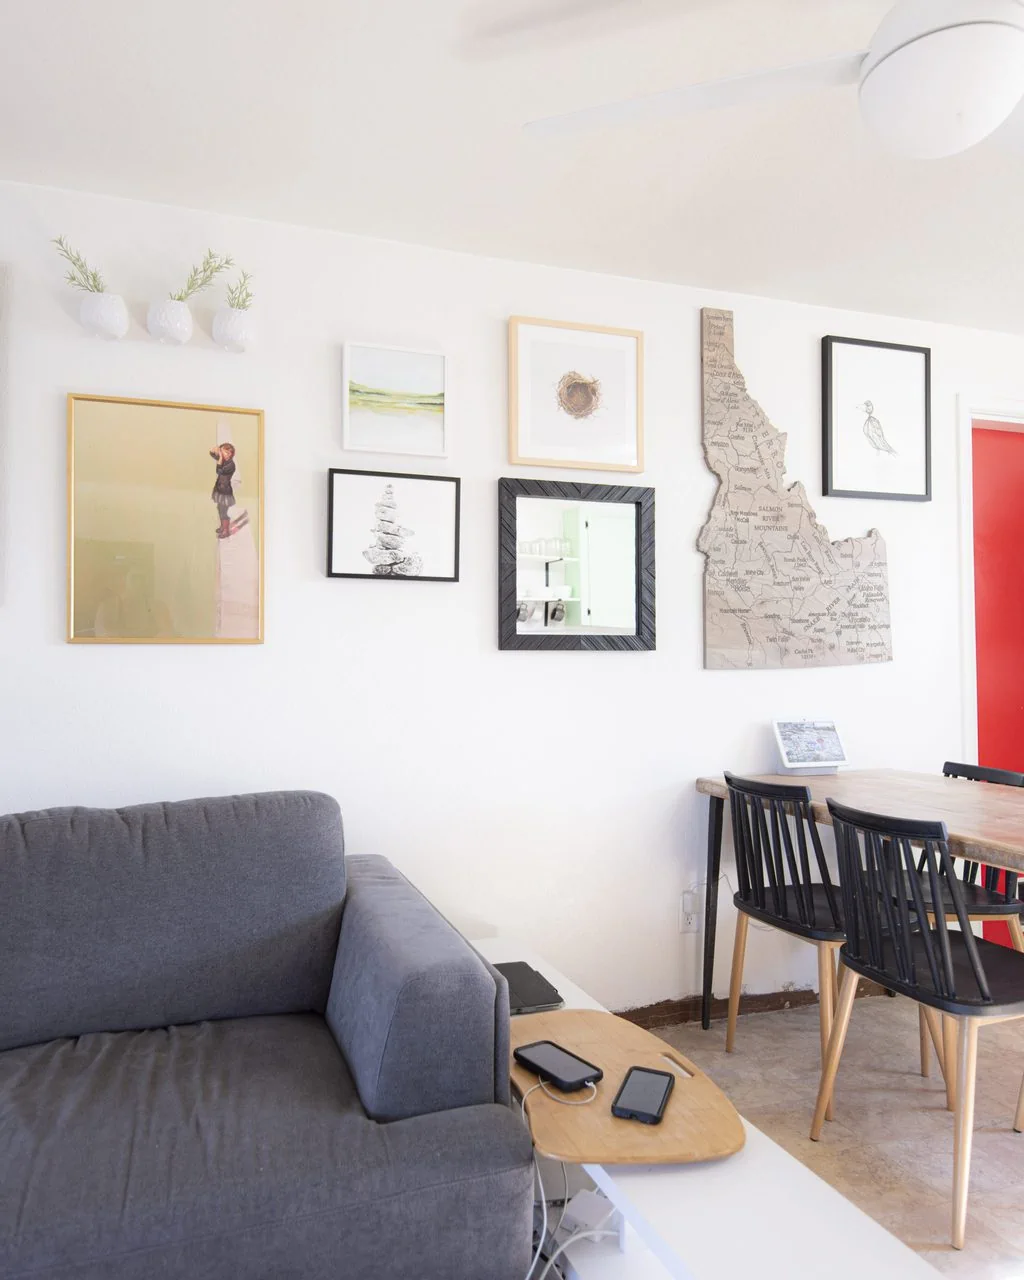
It's always good to start with one or two main pieces to plan the gallery around. I had two large, sentimental items that I knew needed to be incorporated. One was a pretty barn that my grandma painted before she passed, and the other was a wooden map of Idaho that I gave Nate for Christmas.
Being that both of my items were large, I knew I'd want to separate them as far apart on the wall as possible so that they wouldn't compete with each other visually.
Measure and Plan your Gallery Wall Spacing
With your main pieces selected, it's important take note of natural delineating lines in your space. We obviously had the kitchen table to consider. We didn't want to crowd the table with a lot of distracting small pieces. It seemed like a really logical spot for our big Idaho map (which has proven quite useful in dinner conversations teaching the kids about geography).
We also knew that we should consider the couch in our spacing, making sure to balance the artwork across it with a focal point in the center. This was the natural spot for my grandma's art.
With those two items earmarked for those two spaces, we could see the remaining spaces that needed to be filled in. We knew that we had room for a couple pieces to the left of the barn, a handful of pieces to the right of it, and one or two small pieces on the other side of the Idaho map.
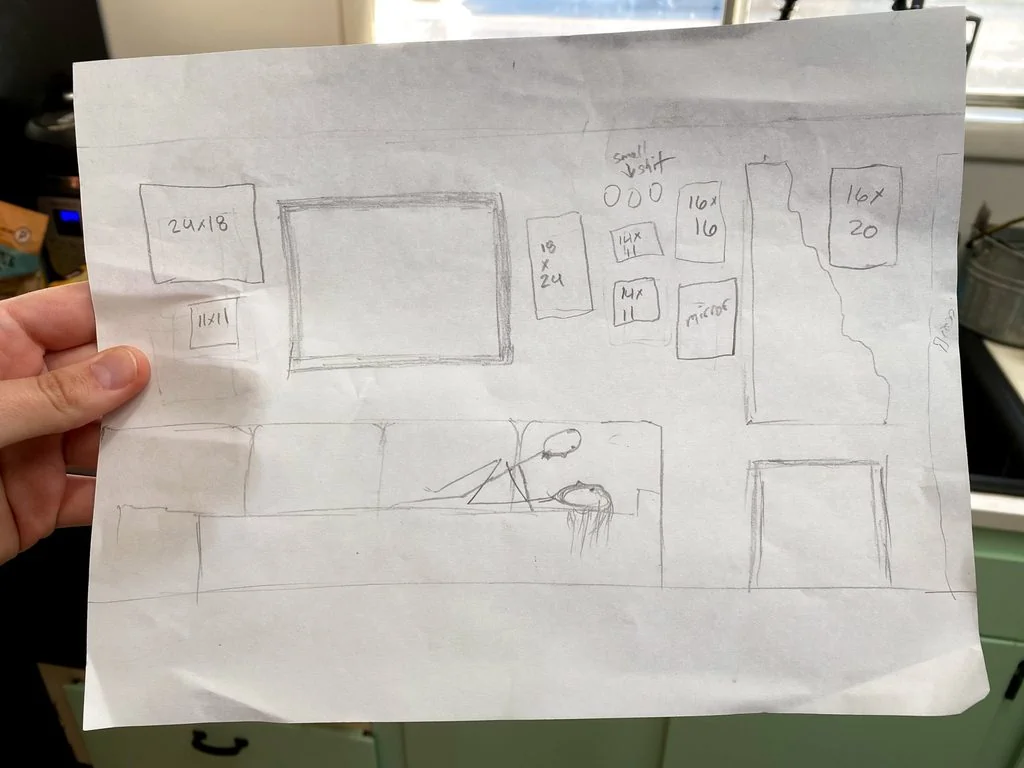
I sketched out a rough idea of sizes I wanted to look for to fill out the rest of the space. Nate added his own artistic flair, as you can see.
Note your Preferred Color Scheme
It's important that each piece is interesting enough to stand alone, but also flows as a whole with the other pieces. I like to pull out main colors and elements from my big, central pieces to complement my smaller ones.
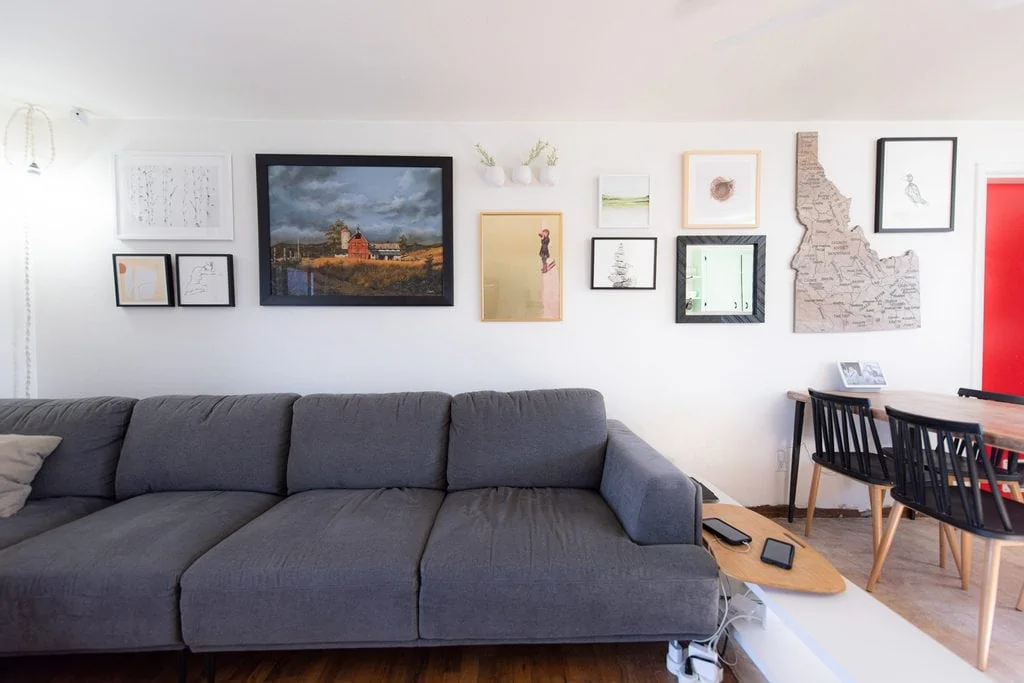
With mint green cabinets and black accents in the kitchen, we knew that some cool greens and dark frames would make the space feel cohesive. The bold red of the barn is more traditional than most of the accents in our home, so I wanted to pull that through with softer pink and coral tones in some corresponding artwork. Finally, I wanted to the call out the golden wheat with some artwork that incorporated natural, rugged elements.
Vary Shapes, Sizes and Styles
The most important part of a gallery wall is making sure the eye flows naturally through it. Particularly with salon style layouts (large groupings like this as opposed to the traditional single-level “museum style” hanging), balance is KEY. Too many similar sizes is jarring to the eye. Balance heavier pieces with lighter picture frames and whimsical tones.
Another critical part of hanging a gallery wall is using a mix of square, horizontal, and vertical pieces. Consider pairing two squares next to each other below a rectangle, and offsetting big pieces with smaller ones nearby. And when you hang art, don't forget to be mindful of white space in between so that the viewer has space to absorb each piece individually.
Once we could see the wall space laid out and knew what tones we were looking for in our artwork, we went searching on the Minted website. They've been a long time sponsor of ours, and I'm absolutely obsessed with their limited edition art prints. We used them in our holiday home decor post as well, and that pretty elk piece of art made the trek from California to this house. It's hanging above Nate's desk.
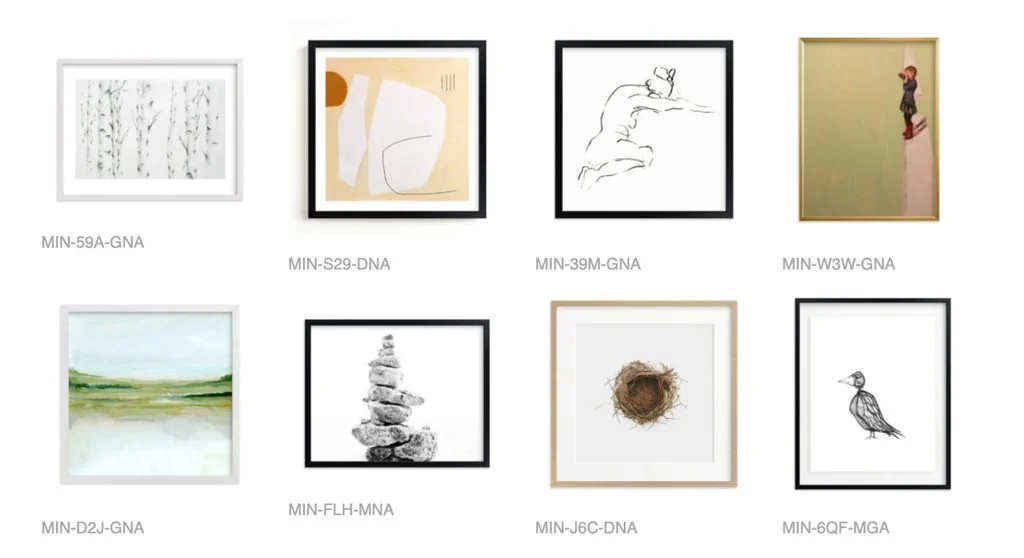
For the current space, we landed on an incredible varied, eclectic grouping that works together and is loved by everyone in our home. From left to right, top to bottom, we chose: Birch Story to reflect our love of nature, Turmeric & Tusk to pull in the red tones from the barn, Model9, Vantage Point in a similar style as my grandmother's work so it wasn't competing for attention, Through It All, Stacked Rocks, The Architect, and The Wise Old Crow.
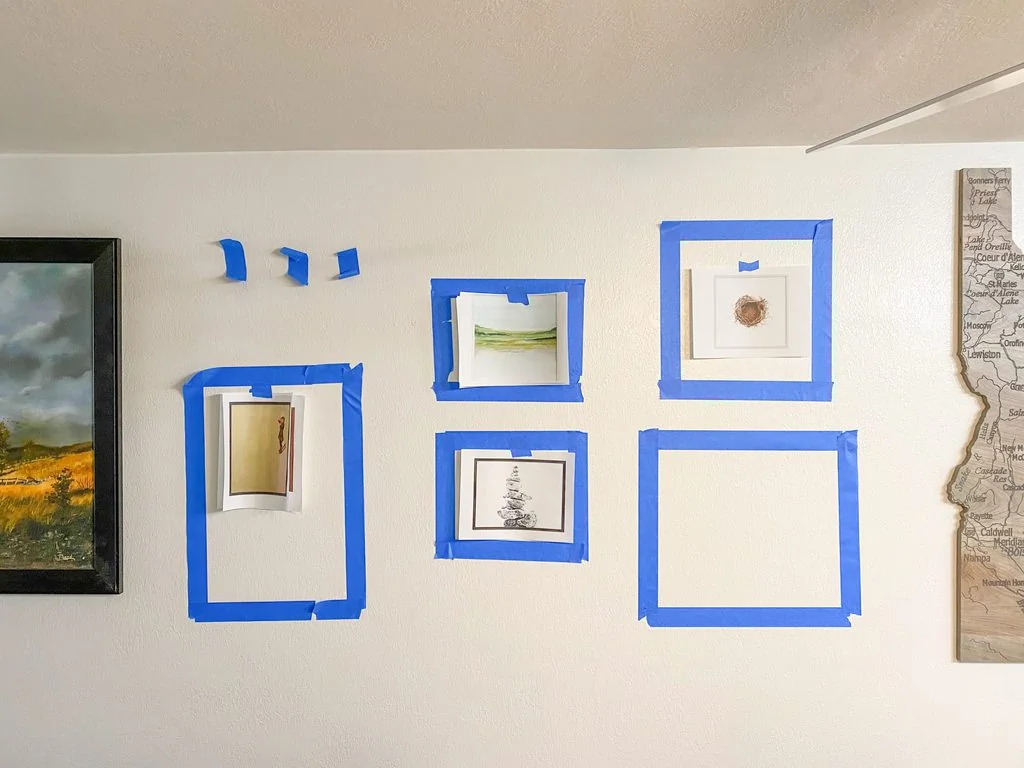
As I picked pieces that roughly fit my sketched-out design, I went ahead and used painters tape to mark out the spacing on the wall. I printed out every piece on printer paper so we could really see how they flowed together. There was quite a bit of back-and-forth on several of them, with Nate and I deciding we both needed to truly love what we landed on. Both of us had full veto power and I can't even tell you how many rocks, trees, and birds we looked at. Those three – for whatever reason – were serious sticking points.
Nobody tells you that half of the process in learning how to make a gallery wall is finding a middle ground between you and your significant other's style. If you're unsure where to start, there are lots of services online that offer consultations with an interior designer for a reasonable fee. I used to frequently consult with experts on stuff like this, before I gained some confidence in my own style.
Pull Patterns into the Framing
With your artwork picked out, frame styles are the next big decision. Vary it from piece-to-piece so that the frames complement the artwork within while also prompting the viewer to continue scanning to gallery wall. I try to offset white frames with black, and add interest with wood grain, metallic finishes and even ornate moulding on occasion.
Mounting is also an important decision. I typically like to use a white mat or float mount (clear glass around the art), but full bleed is often the most appropriate choice for solitary images or photos with a lot of white already incorporated into the picture. I added a white border to one of my pieces that had a white frame, since I felt like it helped the piece stand out more.
Add Mirrors, Accessories, or Personal Items
It's a good idea to break up the artwork with non-art pieces to add depth and intrigue. We added three small pots and a mirror. I've seen people incorporate graduation tassels, dried bouquets,
If you have an existing art collection you want to use, the same methods here can apply. Remember to start with the largest pieces and work your way around them. Go ahead and lay your wall art out in a floor space to get a feeling for how it flows together. And most of all, get creative! I've even seen well-executed gallery walls entirely composed of family photos in different sizes and styles, black and white and color. The sky's the limit!
Hang Art
Finally, with your pieces in hand, it's time to hang your art! This is relatively simple if you've left the painters tape up. The trickiest part here is that you need to measure your nail to hammer in at the hanging point, not the top of the artwork. I eyeball this by deciding where I want the top of my art to go, measuring the distance from the top to the hanging point, and marking that.
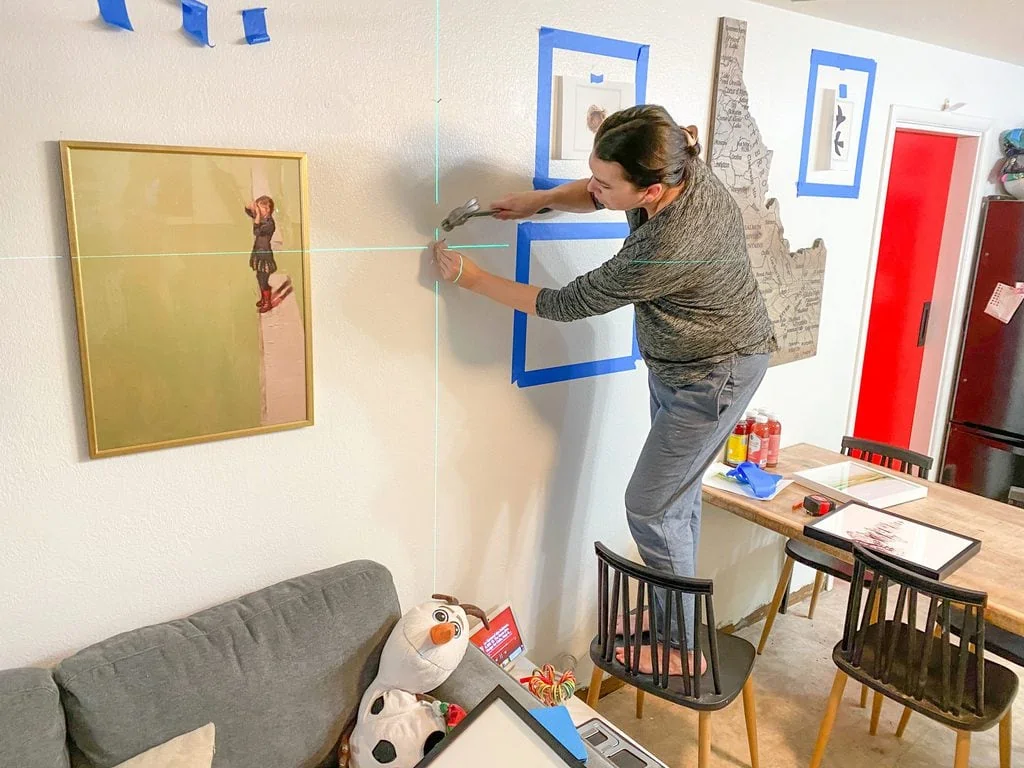
You'll definitely want to use a level (I'm using Nate's laser level here), and I like to use museum putty to make sure that the pieces actually stay level in the event of an earthquake or… general life.
Have you learned anything new about how to make a gallery wall? Are you ready to tackle your own?