
I haven't written about wedding planning in awhile, though not because the planning's come to an end. Not even close. Actually, I've been so busy with all this wedding stuff that when I sit down to write a post, the last thing I want to think about is weddings. I'm weddinged-out. I told my caterer today that I want to meet about the menu so I can “get it out of the way.” Not your typical cheery bride, huh? I'm tired. I need to sleep more.
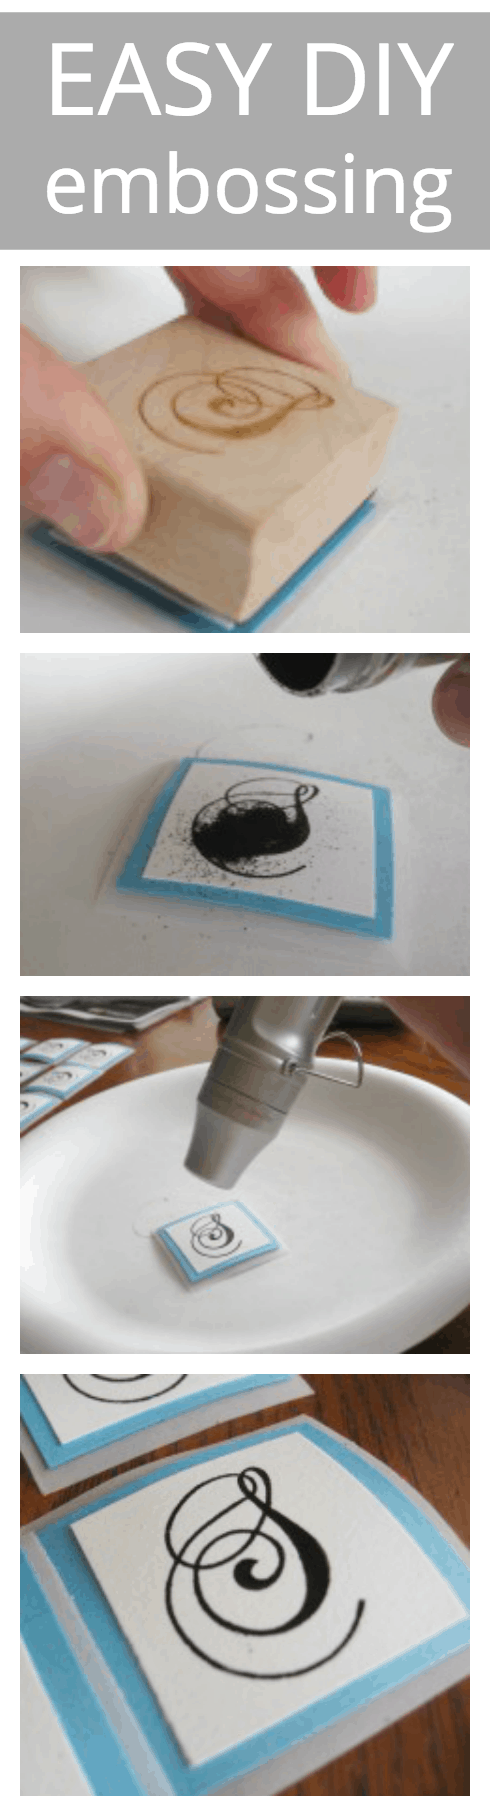
One of the biggest projects I've had on my plate lately is the embossing of all the seals to go on the invites and thank you cards. I didn't have the first clue how to emboss – or what embossing even meant – until a fellow bride whipped out her fancy invites with raised stamps on them, sort of like a wax seal. I was instantly smitten, and harassed my local craft store employees until someone thoroughly explained the process to me. Here goes.
Supplies Needed:
Paper
Rubber stamp
Embossing inkpad
Embossing powder
Heat embossing tool
Small paint brush or Q-tip
I ordered a custom stamp with a fancy “S” (from RubberStamps.net) since our new last name starts with the letter “S.” Since then, a couple people have told me it's technically bad luck to use our future monogram on anything prior to the wedding, like invites. Oh ok. Guess what? I technically don't care.

So I wet the stamp on a special embossing ink pad (available at any craft store) and stamp it FIRMLY onto the paper. A couple times I didn't do it hard enough, and it didn't transfer enough ink to emboss properly.

After removing the stamp, dust embossing powder (available at any craft store), onto the wet ink.

Shake the powder around the enitre stamp to cover the whole area, and then lift the paper and shake the excess powder off. Flick the backside of the paper to get off as much excess powder as possible. Be sure to keep this excess powder – you can funnel it back into the container for re-use later.

Brush away any excess powder with a small paint brush. Powder should only be sticking to the stamped design, and not to anywhere else on the paper.

Using a heat embossing tool (it's like a super-concentrated hair dryer – available at most craft stores for about $30), heat up the powder until it liquifies.

The powder will dry into a slightly-shiny, raised stamp. Voila!
OK, you're officially amazing! I had dreams of sealing my invites with wax… haha.. that didn't happen! Way to make it happen! You're amazing! They will be beautiful.
And we totally created a stamp with our names together for RSVPs. To my parents house, too. Ah, well. We're still going strong!
Please tell me you only invited 4 people to the wedding.